Who are tried to connect Codeigniter with SQL Servers knows the suffering and the time invested to achieve this goal (or at least for me). Here is the steps that I follow, I hope that works for you!
- Download and execute the Microsoft Drivers 3.0 for PHP for SQL Server (http://www.microsoft.com/en-us/download/details.aspx?id=20098). These is not a installer, just a EXE utility to uncompress the drivers for PHP.
- Download and install the SQL Client for SQL Server 2012 (for 64 bits here: http://go.microsoft.com/fwlink/?LinkID=239648, for 32 bits here: http://go.microsoft.com/fwlink/?LinkID=239647)
- Verify what is your version of PHP (Thread Safe or Non – Thread Safe). How to do that? Create a new PHP file with the following content:
Execute the script and verify the row with the name Thread Safety. If says "enabled" your PHP Installation is Thread Safe (TS), if have other value is Non Thread Safe (NTS).

- Go to the folder where uncompress the Drivers 3.0, and select the version corresponding to. In my case, is PHP 5.4 Thread Safe TS, but this choice varies according to your PHP version.
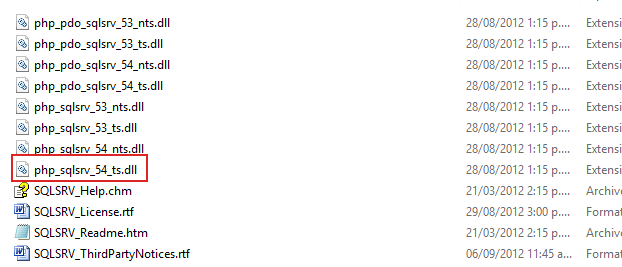
Copy these file and put on the folder of the extensions of PHP (generally is in PHP_INSTALLATION_FOLDER/ext) - Modify the php.ini file (generally located in PHP_INSTALLATION_FOLDER), and find the following word: extension=. Here you will find all the extensions enabled by default in PHP, and you only need to add the namefile of the extension you previously put on ext folder.

Close and save changes, and restart the Apache / PHP service. -
Enable the SQL Server to listen on specific ports. Go to the machine where SQL Server is installed, press keys Win + R, and typing the following: SQLServerManager10.msc (this could change, if you have SQL Server 2012 type "SQLServerManager11.msc"). These command open the SQL Configuration Manager. Go to SQL Server Network Configuration option, Protocols for 'instance name', and double click on TCP/IP option.
On the Protocol tab, row Enabled, select yes option, and in IP Address tab go to IPALL option, and in the row TCP Dynamic Ports make it blank and in the row TCP Port inputs whenever port you like (the standard is 1433)
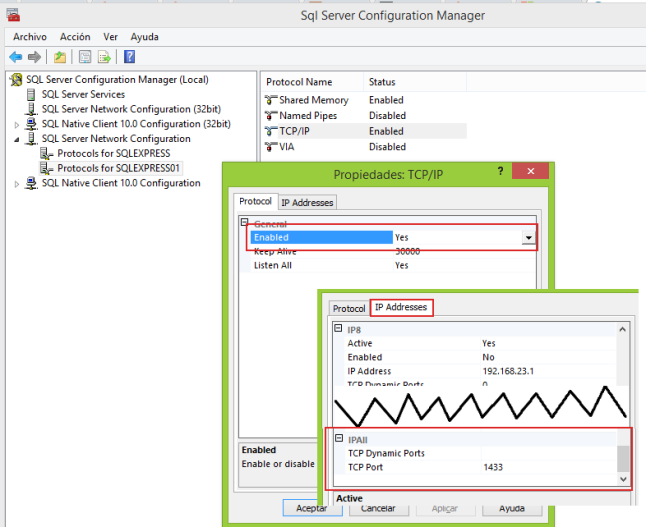
Click on Ok, and restart the SQL Server service.
- Go to Codeigniter, and in the database.php file do the following:
1 2 3 4 5 6 7 8 9 10 11 12 13 14 15 16 17 18 | <?php
/* EXTRACT OF database.php */
$db['default']['hostname'] = "127.0.0.1"; // or put the IP of your SQL Server Instance
$db['default']['port'] = 1433; // or the port you configured on step 6
$db['default']['username'] = 'test2';
$db['default']['password'] = 'test2';
$db['default']['database'] = 'contactos';
$db['default']['dbdriver'] = 'sqlsrv';
$db['default']['dbprefix'] = '';
$db['default']['pconnect'] = FALSE; // Pay attention to this, codeigniter makes true for default
$db['default']['db_debug'] = TRUE;
$db['default']['cache_on'] = FALSE;
$db['default']['cachedir'] = '';
$db['default']['char_set'] = 'utf8';
$db['default']['dbcollat'] = 'utf8_general_ci';
$db['default']['swap_pre'] = '';
$db['default']['autoinit'] = TRUE;
$db['default']['stricton'] = FALSE;
|
- Congratulations! Now you can make any models and querys, and it should work
Source from : https://futbolsalas15.wordpress.com/2014/02/23/7-steps-to-make-sql-server-and-codeigniter-works/


